As I wrote in my Summary of July 2015 my plan was to build a new firewood shed on the backyard of my summer house based on SJ-pallar. SJ-pallar (please see the wood construction above) is the Swedish word for these wooden construction that are today often used for shipping products. My thought was that they would be excellent to use for storing firewood. The future years will give me the answer.
What I needed to make this shed were six leca-blocks (on top of the SJ-pallar in picture above), six SJ-pallar, a plastic roof (PVC), some screws and some pieces of metal to connect everything together. The total material costs ended up at around 50 € of which 30 € was the roof. The six SJ-pallar I got for 10 € but I am sure that one can get those for free with a little bit of looking around and asking people at construction sites.
The most annoying part of the construction was to get the leca-block correct so that the construction would be stable. In the picture below you can see how I have put out the six blocks. I think one could have gotten away with using only four of them if one would like to decrease the costs even further.
Now that the base was correct I could move on with the shed construction and the bottom would be two SJ-pallar that would simply stand on top of the leca-blocks. To improve the stability I attached the metal plates with screws as can be seen in the lower part of the picture below.
The work continued and it was time to attach the walls towards the back. In this case I used bent metal pieces to attach the wall to the bottom. The stability then was not very high and especially the side wall was needed to increase the stability.
Now the first piece of the side wall was up as can be seen in the picture below and I left this piece standing on the leca-blocks. Also here I used the bent metal pieces to connect the side wall to the bottom as well as the back wall. The stability now significantly increased of the entire construction.
Of course the same thing was done on the other side and we ended up with a finished bottom and wall construction for the firewood shed. The structure stability increased one step further with the connection of the two other walls.
The only thing left was then to put on the roof and to paint the sides that are exposed to the weather to expand the life time of the shed for a couple of years. Next year I hope to be able to paint it once again to make sure that it lasts even longer.
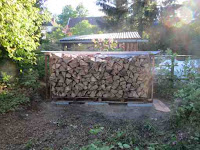
The firewood shed was now completely ready and as can be seen in the picture above I had already started to fill it up. In the picture below you can see what I looked like when I left the summer house. In October we had cut down some trees so we had some large wood logs left. These massive things had to be cut into pieces and I did all that work with a cleave iron and a sledge hammer. Not ideal situation but one takes what one finds.
Conclusion: Even though the back often screams in the beginning of starting to make some unusual physical labour the pleasure from it is great! To see the construction bloom in front of your eyes and this happens in hours and not in years as is often the case in the world of investment can be an excellent change for less patient souls. I think in no way that this made me a better investor to build this shed but I hope that I saved a lot of money in comparison to buying something of equivalent size which means that I will be able to invest more... next month will, investment-wise, be tough though.


No comments:
Post a Comment